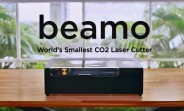
Flux Beamo laser engraver review
Introduction
Laser cutters and engravers are not our usual forte. Yet having acquired a few around the office for various reasons recently, we have been fairly immersed and quite interested in the field. And having seen a few decent reviews, we thought we'd share our impressions by this latest one Beamo, which we found particularly exciting.
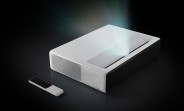
It's the latest project by Flux - a company that first made a name for itself with the sub $1000 Delta personal 3D printer. On paper, Beamo is a pretty powerful 30W CO2 laser cutter and engraver, with impressive 1,000 DPI resolution, a relatively portable form factor at sub $1000 price tag. Well, if you manage to catch one of the early bird specials, at least.

Having spent some time with the Beamo and thoroughly tested it, we can safely say we are impressed. There is plenty of value-packed in this affordable, in relative terms, package. That being said, Beamo could use some polish to the experience in certain areas.
Hardware overview
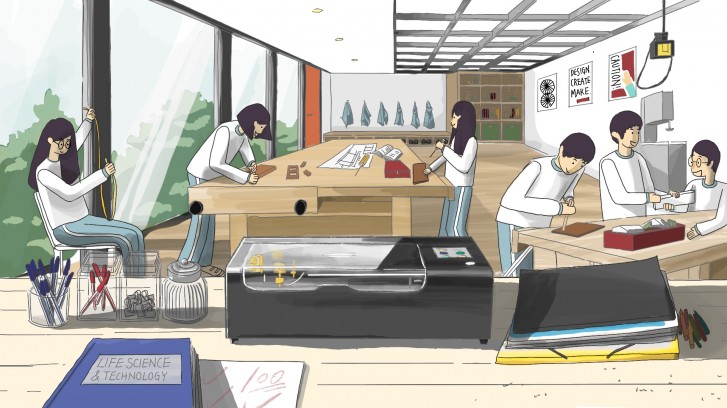
Despite all the playful and child-friendly imagery in the PR materials, Beamo is not a toy and definitely shouldn't be treated as such. There is certain user-friendliness to enjoy about Beamo, but not any room for carelessness. No laser that can cut though actual materials is to be taken lightly. There are safety precautions and rules to follow. Protective eye wear and ventilation to consider.
Things are a little bit more complicated than simply - "don't stare at the bright light". That is kind of the main point that Flux drives home pretty thoroughly in its instructions.
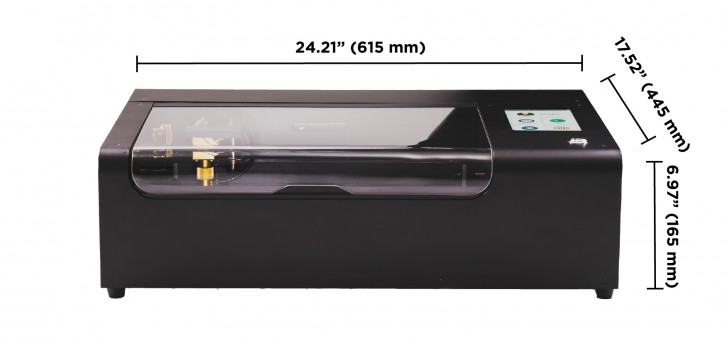
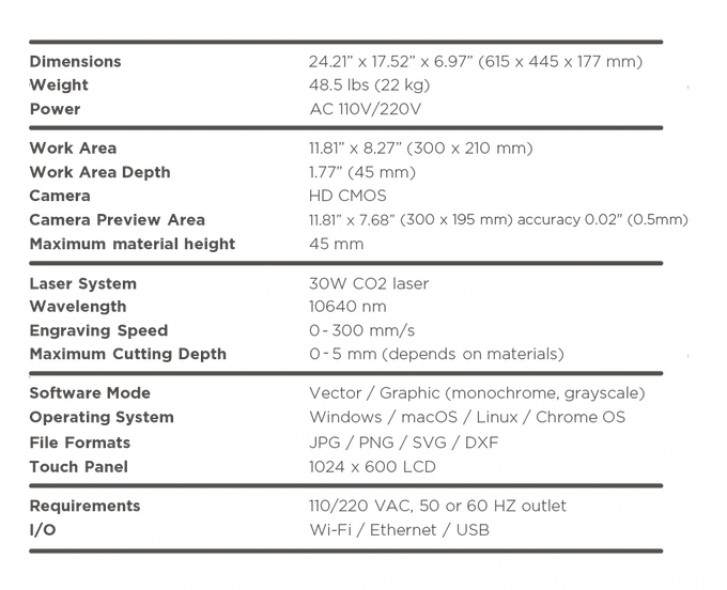
If reading 30W on the specs sheet isn't enough to keep you on your toes, the thick metal casing and industrial-sounding fans of the Beamo should convince pretty much anyone that this isn't a toy. It is built like a tank, its 615mm x 445mm x 165mm body made out of bent thick metal. It has that confident industrial look and feel to it without really looking bad.
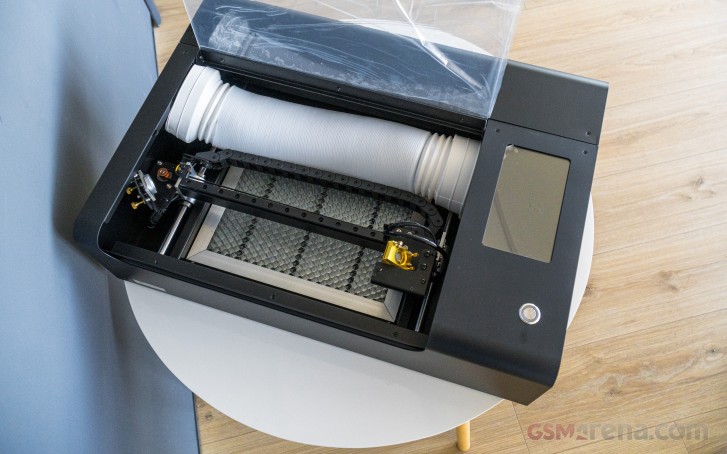
The working area is covered by a big bent acrylic piece that provides ample visibility (not that you should really be staring in) and easy access to the internals. Inside there's a huge honeycomb pattern grate that is meant to support whatever you are working on, while also providing enough distance from the bottom of the unit to defocus the laser beam enough so that it doesn't damage the bottom plate. Our best guess on why Flux went with a thin honeycomb pattern is that it's geometrically unlikely to get in the way of most common engraving shapes. In any case, it is really sturdy.
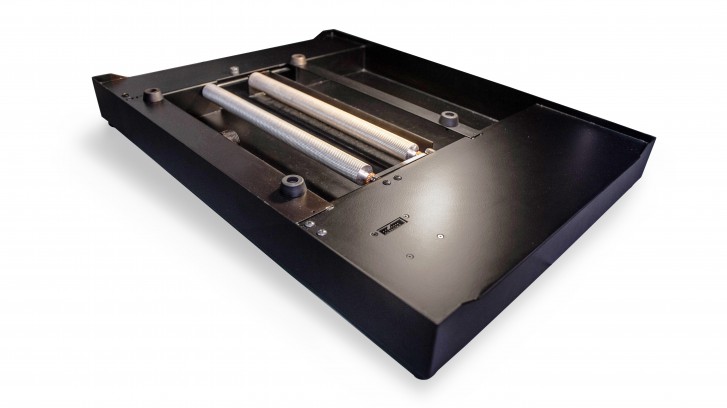
The Beamo lets you detach the bottom along with the grate and place the unit onto a bigger working area so you can engrave larger objects over several runs. That sounds neat, but we didn't really get to test it since we don't really have huge surfaces suitable to engrave around the office, nor the required ventilation conditions to accommodate such an operation indoors.
Plus, Flux might not even include said feature in the US, since it might create some potential health concerns for classroom use. Either way, the default working area of 300mm x 200mm was big enough for our (and probably most others') needs. Our main gripe is the 45mm height allowed really isn't enough for some of the stuff we wanted to engrave.
Moving on to Beamo's cooling and ventilation systems. All the actual guts of the machine and most notably the big CO2 tube are cooled by an internal water loop and that just tickles our inner-geek the right way.
The Beamo is loud, really, really loud, mostly due to the huge fan strapped to its back side. That's the exhaust, which you are expected to route somewhere outside the room. Flux even provides you with a flexible plastic tube and the bracket and tool to secure those to the back of the Beamo. Definitely don't skip this part, since otherwise you can create a breathing hazard in the room or even worse if you are working with something like carbon fiber. See, we did our homework!
That fan is pulling double duty. On the one hand it creates a massive airflow and positive air pressure while the machine is working to clear any dust, particles and smoke away. On the other hand, some of the air also gets routed in a nozzle near the business end of the CO2 laser, which helps with fire-prevention.
Actually since the laser is effectively burning material away, it's more of a fire containment procedure, since fire is expected. Not really open flames, though. The manual has a few pretty hilarious, yet jarring paragraphs on that topic. Keep a damp towel nearby and don't really leave the room, being the gist of things.
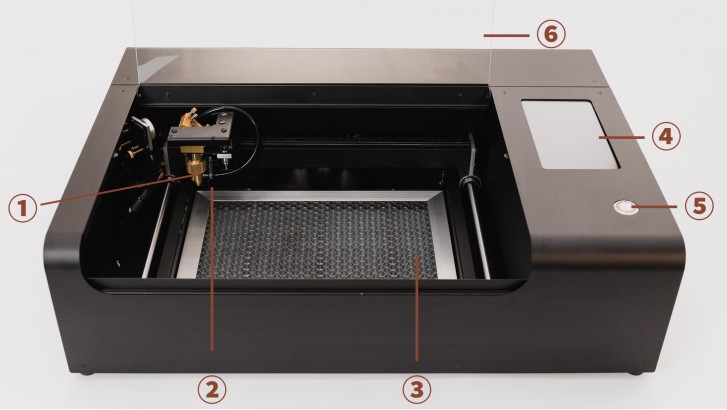
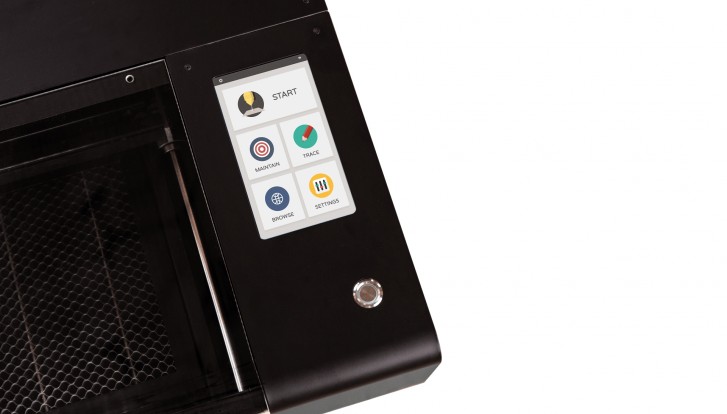
You get a single very satisfying and reassuring power button. You can always use that to stop Beamo in a hurry. Lifting the acrylic cover also cuts-off the laser on a hardware level, which we definitely appreciate, since the abort buttons on the integrated touch screen and the remote software can get stuck at times.

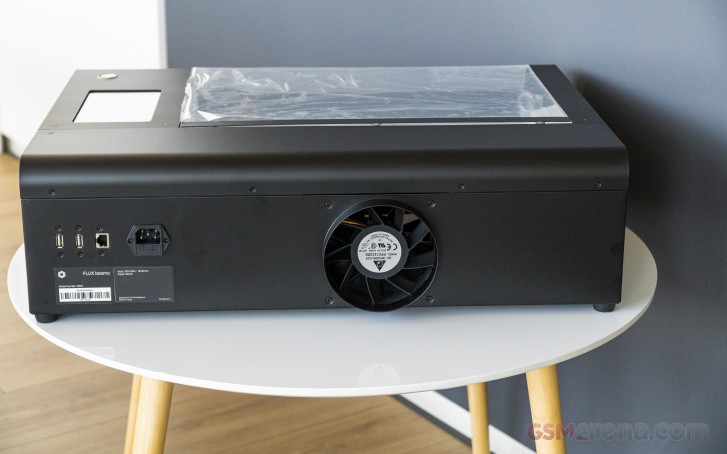
On the back of the Beamo, we find that powerful fan we already mentioned, along with a standard power socket two USB ports, one of which is meant for the bundled Wi-Fi adapter, as well as an RG-45 port for Ethernet so you can connect to the device in whichever way works best for you.
Features and capabilities
So, impressive hardware and aggressive pricing - also check. But, what can you actually do with the Beamo? Well, plenty, actually. Most of it with impressive ease, compared to pro solution.
Yet, we might have just over-hyped Beamo slightly in our original article, back when we first leaned about it. To be fair, though, some of Flux's advertisement was rather unclear on this end.
Long story short, Beamo is an engraver first and foremost and can very rarely serve as an actual cutter. In its default setup, the 30W CO2 laser does well with carving things with an impressive level of precision and resolution. Actually cutting them rarely works great. Even things like wood and thick cardboard are kind of unpredictable when it comes to actually trying to cut all the way in.
Also we metal isn't a friend of the Beamo even for carving. You can easily take the coating off of something like a brushed aluminum piece, but carving out bare metal is a no-go.
It's just that in its nature, a CO2 laser is better suited for some tasks and less than ideal for others. Flux recognizes this and promises an optional add-on accessory for Beamo, which essentially straps a semiconductor laser to the machine. That one should have what it takes to work on metal.
Since we are already on the topic, other optional add-ons for the Beamo, which should be made available at some point include a different bottom that lets you work with rotating objects. This is meant for engraving things like cups and also increases the maximum height of the engraved object to 105mm. That's one bit we would really like to try out at some point. Another add-on Flux mentions is one that enables autofocus on the laser. Pretty nifty, since the current setup is prone to error.
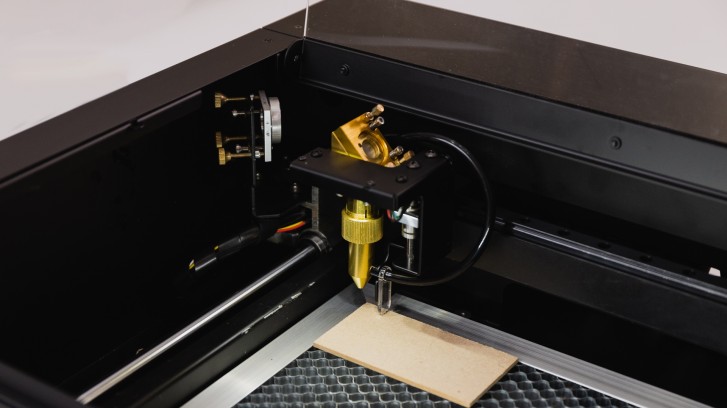
And what better time to explain how focus on the Beamo works in its current state. Taking a small step back here, it might be beneficial to provide a simple explanation of how the CO2 laser actually gets guided to its target.
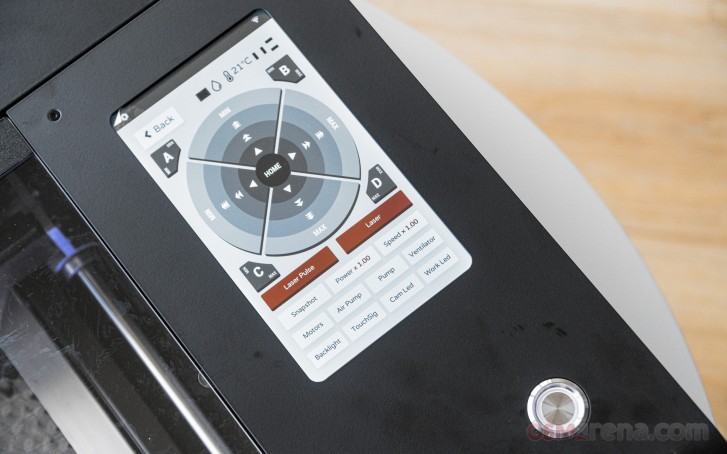
The actual CO2 tube is concealed in the top part of the unit. From there fires the laser beam into a set of two mirrors, which move about to hit the set X and Y coordinates. One is mounted on the side, while the other is part of the nozzle assembly that is being floated about the working area. The final piece of the optical puzzle is you using a rather rudimentary, but still functional system to focus on the Z axis.
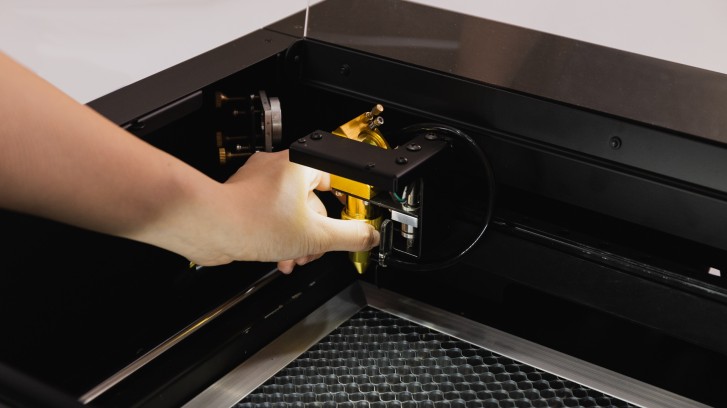
First you bend a piece of acrylic down from the air house on the nozzle. Then you loosen the metal ring around the nozzle, which allows you to slide the entire assembly up and down. You do so, accordingly, using the acrylic piece as an anchor point. Then tighten things back up, bend the acrylic up and you are done.
Clearly something that could be automated, like Flux is apparently doing with an add-on. Yet there will be added costs to that. It could very well be worth it, though, if that enables variable depth carving, which doesn't seem to be a thing right now. Right now you are limited to some shading, which we had mixed results with.
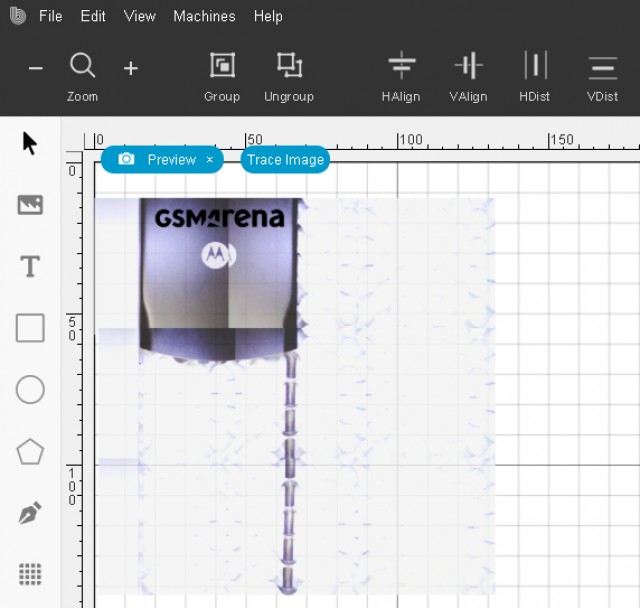
Imperfect camera preview
As for guiding the laser on its X and Y path - that is Beamo's job and one it does pretty well, moving that laser beam around at up to 300 mm/s. That's one advantage of CO2 lasers over semiconductor ones - speed. Having said that, you do need to go much slower to achieve results with certain materials. The actual positioning bit is done via a camera that is mounted next to the laser nozzle.
It generates a grid of (sometimes imperfectly stitched) images and shows you the item you currently have in the machine. Then you can simply drag, drop, resize, group, layer and many other things the cuts and groves you want to make. It's really user friendly and lets you start producing decent stuff in no time.
Like we already mentioned, though, the system is not perfect and besides poor image stitching, there are also issues with finding the boundaries of your actual working area. Flux could have definitely done a better job marking those out physically inside Beamo. The top segment of the honeycomb grate seems to be unreachable, as well as some of the farther corners. We found that placing objects a bit closer to the center of the inside area worked best for us.
Results showcase
Before we move on to the software and workflow side of things, where some of our most serious gripes with the Beamo reside, we felt like we should show you some of our creations and experiments first, just so you can get an actual idea of what to expect.
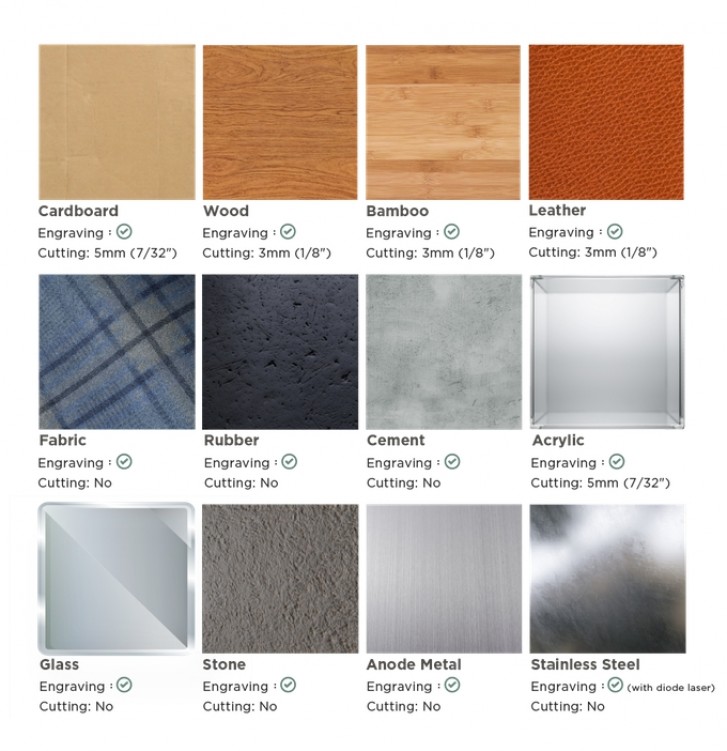
Wood is a great place to start as it's a material the machine works with pretty well. That being said, you do need to take extra care to fine-tune your power and speed parameters for the each particular wood type, composition and thickness. This is even more important if you want to do full depth cuts. Those can be hit or miss and you definitely want to set the Beamo for more power and an extra pass or two, rather than be conservative about it.
Engraving, on the other hand works better with a lighter touch, otherwise you end up with more black burn paths. The good bit here being that you can use layers to make certain paths deeper and others softer, as needed. Plus, vinegar with a paper cloth is surprisingly effective at cleaning wood burn residue.

Like we mentioned earlier, the Beam studio software comes with a set of convenient presets for different material cutting and engraving. The latter comes in two variations for certain materials - monochrome and shading. It looks deceptively simple within the software, you just import and image with different colors, flip a switch, which makes to software stop re-interpreting everything as black lines and you are good to go.
When Beamo reaches a line that needs to be grey, it will dial back its power accordingly. In our experience, it was pretty difficult to actually pull off good results with shading. The Beamo was clearly working as intended, but the input images we selected weren't quite suitable and we found that you have to carefully preparing your input image, selecting distinct enough shades.
Especially if you are converting something like a photo. Take your time, experiment and definitely follow one of the many tutorials online for properly preparing a photo for engraving. It matters a lot. The big cutting board below has shading in certain areas, which, frankly, ended up spoiling the end result more than helping, since it was our first try.
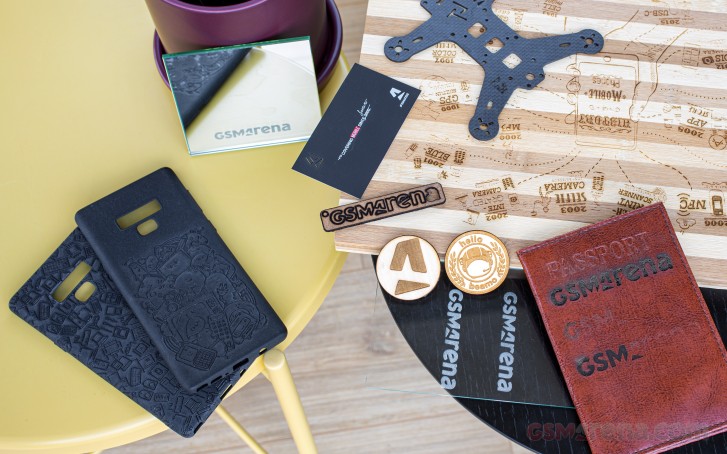
Another material that supports shading as a preset in the software is leather. We had just as hard of a time trying to get that one right though. The passport holder we sacrificed for this experiment has a solid logo burned in monochrome mode first, followed by two shaded versions of our two-color logo at increasing intensities.
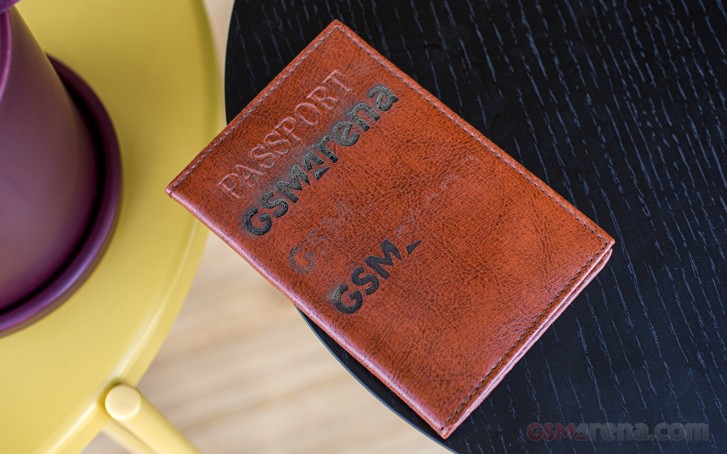
Clearly, we never quite managed to get it right. Judging by the first engraving, leather is pretty tricky to work with, since it definitely benefits from a lighter tough, or rather gets drastically worse if you go too far. All the while, going to soft on it does little due to its surface strength. A fine balance indeed.
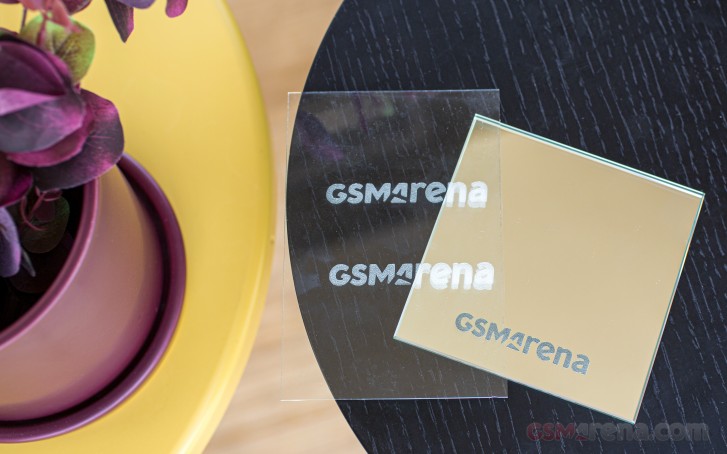
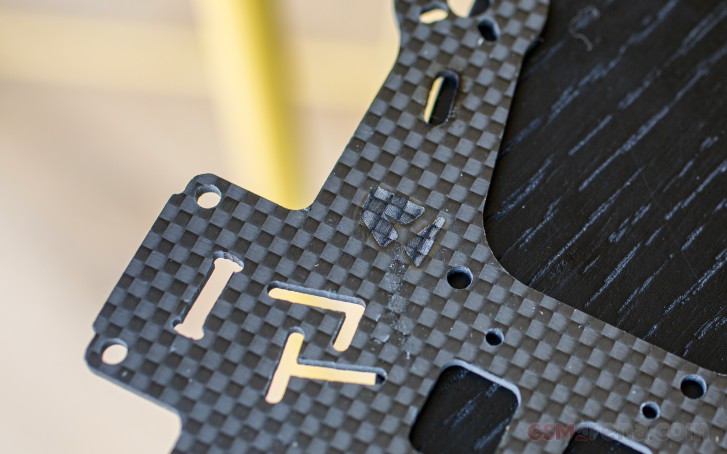
Glass works out surprisingly well. You get this nice dot pattern effect in the final engraving, which can really show off the amazing resolution Beamo has. Tweaking the power parameter of the glass preset has a very direct and tangible effect on the depth of the carving. Results look even better and more professional on a mirror engraved from the back side.
After from wood, though, our biggest success story was probably rubber. Beam studio has a preset for that as well and while it doesn't support shading, its simple monochromatic output works really well on the phone cases we tried. Again, you can really see the amazing fine resolution Beamo can achieve.
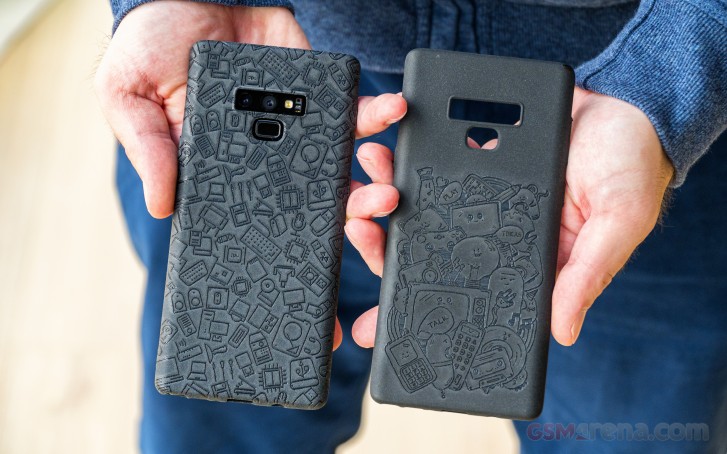
Plus, there is plenty of room in the spacious working area to pull something off like an overlapping pattern and cover the entire case top top to bottom. Beamo's design meant we didn't have to worry too much about going outside the lines, so to speak. We think the results speak for themselves.
Like we said earlier, though, Beamo definitely has its limitations. Beyond the rather frustrating height constraints, some materials just didn't submit to the power of the CO2 laser. Metal proved particularly tough, as expected. The vanilla Beamo laser can barely scratch stainless steel.
Anodized metal with a coat on top, like the back plate of an old Motorola RAZR V3 we had at the office worked out pretty well, though. So, a mixed bag. We also tried engraving a plate we bought from the dollar store (so likely not ceramic). The laser did take a few layers off that, but due to the color of the surface, the effect was less than impressive.
We even tried a carbon frame from a small racing drone and that had the same issues as the plate. Layers did come off, but the nature of the material made the grooves hard to spot. We definitely would not recommend working with carbon fiber for another reason too - it had us scared on a few levels.
First, there was the fear of microscopic glass fibers getting on skin, or worse, being inhaled. Plus, this is probably the only material that produced sparks while Beamo was working on it. Likely glass being incinerated. Pretty, but also quite scary.
We put together a small video of Beamo at work on different materials. It is sped-up quite a bit in most segments, since engraving is generally a pretty slow process. Beamo is nice enough to give you an exact calculation of how long each of your projects will take. The number varies wildly with size, complexity of the job and material, preset, power and speed of the laser. We had tasks as short as a minute, whereas the cutting board took over 45 minutes to complete. Pretty understandable, given that we basically filled up Beamo's entire working area.
Operation and ease of use
Software is definitely the make or break aspect of a product like Beamo which basically aims to offer pro or near pro-grade functionality to a broader user base so things need to be easy and straight-forward. Those two Flux has basically nailed.
The only issue we had was with the initial setup - our advice is to just grab the Beam Studio app and not the Flux app, since the former works and the latter does not, despite what the description on the Flux website says.
Unfortunately, where Flux kind of dropped the ball on with its software is polish. To be fair, this could be partially down to the still early nature of the product and hopefully some of the more annoying issues like unstable connectivity and misbehaving camera preview will be patched. In its current state, though, there are some notable issues.
Currently, the basic workflow with Beamo has you picking out, capturing or drawing a suitable stencil, pattern or image and importing it into Beam Studio. Yet as we mentioned, some extra steps need to be taken to prepare some images for engraving, especially color photos. And for the most part Beam Studio does not take care of that part of the process.
You could, of course, decide to compose an image entirely inside Beam Studio as long as you keep things simple and stick to three basic geometric shapes, rotations, corner rounding, as well as text with a selection of fonts.
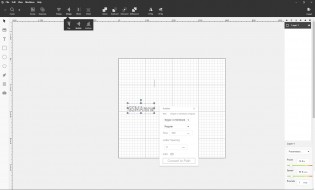
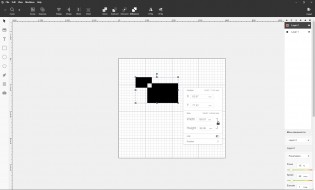
Basic editing and creation options in Beam Studio
To the company's credit, Beam Studio does offer a surprisingly robust layer system, like the one you would find on good image editing software. It works pretty well for selecting different speed and power parameters for different cuts and patch within your final creation. Those, by the way, are housed in the lower right corner of the UI as sliders, along with an execution counter.
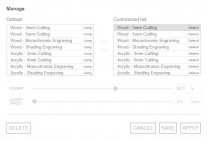

Parameter presets • Shading • Camera preview
Above these is the preset menu. In our testing, most of the default items on the list worked out pretty well. Once you start experimenting for yourself, you can add more custom ones to the list, which we found very useful.
With the image prepared and properly layered with parameters and presets tweaked for each layer all you need to do is engage the camera preview, select a patch of the working area you want previewed and potentially give it a few tries since the photo snapping and stitching is not exactly reliable.
Then you line things up, press export and leave Beamo to do its thing. You can use the Beam Studio to monitor the progress of your task, as long as the connection does not drop, which does happen from time to time. There is even an option to engage the on-board camera for a real-time feed while Beamo is working. Unfortunately, it is positioned in such a way that you always see a bit below the actual laser hitting point so it is a bit useless.
Since looking at Beamo working with no eye protection is not advisable and, let's face it, you will want to look, we believe setting up a separate streaming camera solution is the best way to go.
As per Beamo's press materials, there are ways to engrave without Beam Studio. Well, sort off, since the Trace option on the built-in touchscreen UI is currently not implemented. Just like the browse option, which, presumably, will give you quick access to an online repository of stencils, patterns and images for carving. Something that beginners will definitely appreciate. Hopefully, that gets updated in soon.
What you can currently do, however, is export you Flux task from the Beam Studio and then load that on a USB drive and get it to Beamo that way. Not ideal, but it's at least some flexibility.
What we elected to do instead during our testing is to dedicate a small laptop as a workstation next to Beamo to initiate tasks conveniently. For any more complex work within Beam Studio, we simply used a regular PC workstation and the convenient .bvg scene saving format Beam Studio supports to transfer projects from one PC to the other. We can only imagine this format will be incorporated in any future mobile app Flux builds for Beamo.
At the time of writing, the company only has an Android app available for the Flux Delta. Judging by some of the press material, a Beamo mobile app is probably on the way as well.
And that pretty much sums up the current software state of Beamo and our general feelings towards it. The groundwork is there and shows a lot of promise. It is usable in its current state, but with some frustrations - mostly that all the creature comforts and user-friendly enhancements are hinted at or in some state of readiness, but no quite there yet.
Various considerations and final thoughts
To be perfectly frank, we have a rather limited frame of reference when it comes to the Flux Beamo. For us, personally, it constitutes a big upgrade over the small, entry-level 2W red laser engraver we also have kicking around the office. And while much more capable than that Beamo is definitely not professional-grade equipment.
Still, it comes close and going by our personal research on the laser engraver niche, it offers quite an impressive package at a competitive price point.
As such, it Beamo really does seem to strike a great middle ground. It's not too bulky, yet big and flexible enough to accommodate most common use cases. It's not overly powerful, but definitely not lacking. Feature-complete, but not overly complicated. Really, the main gripes we have with Beamo have to do with the lack of polish in certain aspects of its software and perhaps the partially unclear nature of some of its advertising materials.
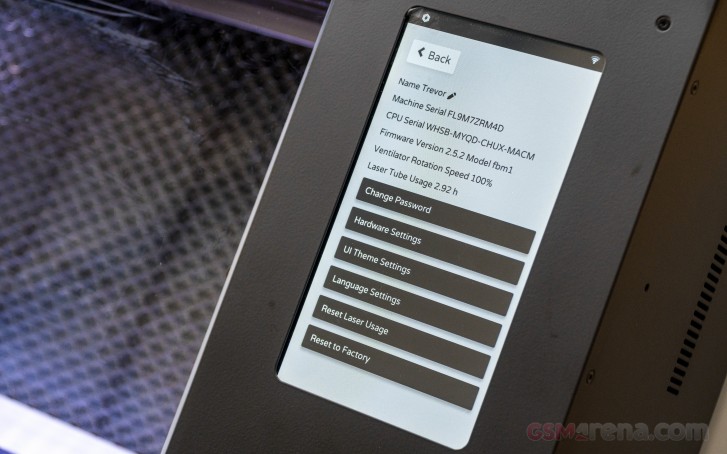
If you do find yourself considering Beamo or a laser engraver in general, we hope our observations will be of use. And here's another potentially useful bit -there is maintenance to consider - another piece of rather obscure information.
Flux says that cleaning the lenses on Beamo should be a weekly task. There is also rail lubrication and water level in the cooling system to monitor. Do all this correctly and Beamo should last you about 6 months to 1 year on its factory CO2 tube. After that, you will have to hit-up Flux for parts. Pricing and availability for these is not yet confirmed.

What we're getting at here, yet again, is that Beamo is not a toy nor is it really an advisable impulse purchase just to have. It's a specialized tool, crafted and offered in a noticeably more user-friendly manner. That being said, we feel like Beamo would make a great addition to any small shop or specialized classroom.
Related

Reader comments
- AnonD-731363
- 25 Nov 2019
- SH3
Phew kudos for anyone who will read it from start to bottom of the page.
- Love the Community
- 25 Nov 2019
- Fv4
These initial comments though. I wish they say the same for PC Graphics Cards.
- CompactPhones5ever
- 25 Nov 2019
- 8uS
Interesting article, I'd definitely like to see more non-smartphone tech reviews here.


 Xiaomi
 Samsung
 Samsung
 Nothing
 OnePlus