Nokia N90 camera review: Exceeding the expectations
The new Nokia N90 mobile phone prides on a two megapixel camera equipped with Carl Zeiss optics. Besides, it has a wide array of camera controls and picture settings. Is the new Nokia N90 the best photo mobile? This article includes a direct comparison between pictures taken with Nokia N90 and pictures taken with the excellent Canon G6 digital camera.


Official photos of Nokia N90
Just days ago you had the chance to read our review of the Nokia N90. Can we still speak about this model as of a mobile phone? It is a multifunctional device, which serves not only as a phone, but also as a communicator, a MP3 player, a digital camera and a video camera.
Disappointment did not last much
When I was writing the review about Nokia N90, I got seriously disappointed by its built-in camera. Everything just spoke in its favor: the optics with Carl Zeiss hallmark, the sensor with two megapixels, incl. previous experience with the 6630 and 6681 camera models. We all expected Nokia N90 to be one of the best photo mobiles ever. So imagine how great my disappointment was when I found out that auto-focusing takes three long seconds, pictures are often blurred and finally, text shots can be considered nothing else but a plain shame. To be honest, at first I tended to think that the fault was rather mine for all pictures advertised in Nokia N90 official presentation look brilliant.
Eventually, things found their places. By mistake, Nokia had provided us with a phone, whose camera was not the final one. So we were immediately given a new phone, whose tests left no doubts and made all editors in our office claim in one voice: "This camera is really good!". That is why we decided to prepare a separate review of the camera of N90, in which we offer you a lot more sample photos.


Nokia N90 displays all its beauty
How should I hold this?
Nokia N90 has a special construction - it features a rotating display and camera. It offers two hold positions for taking pictures - one is in the same style as if you are holding a video camera, the other one is the classic photographic camera position. In the first case, the main high-quality display plays the role of a viewfinder. It shows 262K colors in a resolution of the incredible 352 × 416 pixels. The device is controlled by the joystick, mounted on the right side of the phone. The joystick itself is manipulated by user's right thumb. The shutter button is situated just above the joystick. Moreover, you can even press the rotating camera downwards by using your thumb. To use the menu, use your left hand and press the two buttons placed next to the display.


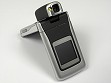
Holding the phone to take a picture
If you prefer to take pictures in the same way as with a common compact camera, you will need to close the phone. You need to turn the camera part crosswise; the small outer display serves as a viewfinder. It is active, displays 65K and offers a resolution of 128 × 128 pixels. The entire control process is done by the joystick on the top edge of the phone. Right next to the joystick is the shutter button. Unlike standard photo cameras, here the control is managed from the opposite side with one's left thumb. This is a bit unusual, but needs just a while to get used to. The inconvenience of this handhold is that the rotating part of the camera needs to be turned by the lower end - its mechanism does not allow a full rotation of 360°; if you try to rotate it along the top, the camera part gets stuck into the stop, which results in the camera lens looking upwards without a possibility for further rotation.
The camera control application starts automatically once one of the described positions has been set. Besides, you won't even find an option that allows manual activation of the camera, because it is simply unnecessary.


The camera of Nokia N90 is mounted in the rotating interlink of the phone.
Always prepared
Even though the standard camera handhold does not offer a perfectly comfortable viewfinder, the photographic process is much faster. A single turn of the camera part is enough for the camera to start running. When you turn back the camera part to its original position, he camera keeps on being active for about 3 seconds and then turns off automatically.
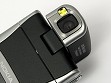
The viewfinder is dominated by a focusing white square. The state icons are shown on the upper margin of the display. They provide details on the currently activated scenic mode, the number of pictures the free memory space allows for, or the charge level of the accumulator. In the bottom end of the display you will see the flash setting indicator, the digital zoom indicator as well as an icon that reminds you that a press on the joystick will take you into the main menu. To start focusing, just press the shutter release button about half its way down. In a moment or so the focusing square will turn green, which is a signal for you to press full the release button.


Camera's viewfinder • when you switch options quickly with the joystick the active flash setting gets shortly viewed in the from of a text legend (the relevant icon never disappears)
The capture of a certain scene, including the focusing process, takes approximately two seconds. The average time we measured was 2.14 sec. If you are fast enough and manage to give an immediate confirmation, you may succeed to take another picture in two more second, or if we have to be punctual, in 2.33 sec. From a stand-by mode a picture could be taken in less than three seconds. Beside the time for focusing and saving the picture into the memory you need to also take in account the time necessary for the camera part to turn and for the relevant application to get started. After a short training we managed to achieve an average time of 2.61 sec.
Just like with a real camera
When you hold the phone in a camera mode, the camera application is activated by the joystick placed on the top side of the phone only. By moving it forwards and backwards you roll in the menu, viewing this way the options for activating the diode flash - automatic, constantly on, off, red eye reduction. By moving it to the right the scanned scene gets zoomed in, by moving the joystick to the left it gets zoomed out. Instead of this, I would have rather preferred exposure compensation for the zoom is digital only, so not really usable.


The joystick that serves the camera control is situated on the right side of the phone, right next to the release button
A press on the joystick takes you into the menu. By moving it forwards/backwards you navigate the menu. A move to the right or to the left is used for selecting a choice, which is then confirmed by another press on the joystick. The first option in the menu is the one that allows you to choose the right scenic mode - automatic, macro, night mode, sport, portrait, landscape mode and user mode. The automatic mode works very well. In this aspect, the sport mode is quite practical for it "forces" a shorter exposure time on the camera. In all other cases the mode setting is done automatically according to the conditions defined by the relevant scene - incl. the macro mode.


Camera's main menu • mode selection
On the second place in the menu is the flip over option. The picture appears on the display upside down. This mode is quite good for making self portraits. More from the menu: the self-timer delay, which has values of 2 and 10 seconds. The option for setting the exposure compensation is offered on the forth place.


When you make portraits you need to turn the view upside down • setting the exposure compensation
The picture size options are the last to come. There are three possible resolution modes to choose from (2 MP - 1600 × 1200 pixels, 0.5 MP - 800 × 600 pixels, 0.3 MP - 640 × 480 pixels). You can also choose, whether pictures should be saved into the phone or on the memory card. Also available is the option for a short view of the picture just after it has been taken.


Setting the self-release function • more setting options
You will need both your hands
When you hold the phone in the way typical for standard cameras, the number of curious glances around you will surely multiply. In this position the phone looks rather futuristic; its ergonomics are excellent. Use your right hand to hold the phone firmly and your thumb to control both the joystick and the shutter release button. The latter two buttons are easy to manipulate. The joystick sometimes slides away when fingers are sweaty. You will hardly ever use your left hand here. Perhaps, only when you want to view ready pictures or set a certain function.

Context keys above the display (next to the display, when you take pictures)
The viewfinder is brilliant; it really can compete with any viewfinder of a digital camera. In the left margin of the bottom line there is a legend of the relevant function of the context key that lies next to the display. Beside this, here you will find information about the number of pictures still possible to take as well as details on the state of the accumulator. In the top line there is a legend of the second context key. At the opposite end of the line information on which mode is currently activated is provided- the static picture scan or the video mode. The state icons appear in the column in the right margin of the display. In its right bottom corner, out of the mentioned column, there is an icon indicating the resolution that is being used.


Camera's viewfinder • when the zoom gets activated a scale appears in the right column
When shooting, a white square appears in the middle of the display. When you focus, it does not turn green. The focusing process is indicated by a blinking icon in the column on the right. Blinking stops when the focusing is over. If it changes from green to grey, it means focusing has not been successful. Unfortunately, during the focusing process the exposure parameters are not blocked.
Both the flash and the zoom functions are controlled by the joystick as well. A press on the joystick opens the photographic functions menu - inside the menu you will find various scenic modes as well as flash and exposure settings. These functions include the same setting options like in the horizontal handhold mode. Two more options have been added though - white color balance and color effects. In the first case you can choose out of four types of light (sunny, cloudy, bulb light, luminescent light), or leave on the automatic mode. In the other one you are offered sepia, black & white or inverse picture scan.


Camera's main menu • photo settings o mode selection
What I don not like about the exposure compensation is that the view-through it offers at the scene that is just being scanned is much too small. I would rather have the setting controlled by joystick as well as a full viewfinder, but apparently, I am not lucky... I would have also appreciated an option that would let me leave the menu by moving the joystick to the left. Not having it, however, I am forced to use my left hand to press the upper context button next to the display.


Photo settings - so bad that the view-through at the picture is so small
Reader comments
- andre
- 28 Oct 2007
- MWW
I don't think the camera of this mobile is that good. The N70's camera is better for me. Only the design of this mobile encourages you that there is a high quality camera in it!